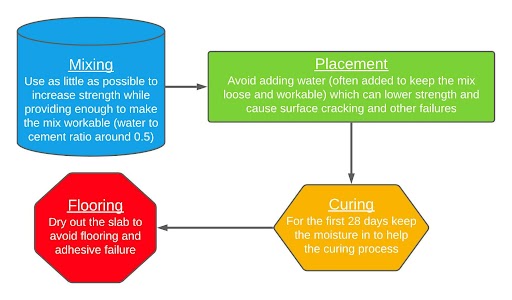
Concrete is one of the main components of just about every building project. Typically, concrete is poured for the foundation of any project, but it is also used as floors, walls, and ceilings. All concretes include a binder or glue and an aggregate. The binder holds everything together while the aggregate provides strength and durability. Portland cement, stone, asphalt, and urethane are other common components. Careful attention needs to be paid to how moisture is involved in these components, which can severely impact the strength and durability of the concrete. The process of creating concrete to be used for flooring and how moisture is involved is illustrated below.
Understanding the chronology of moisture throughout the installation process is paramount to avoiding issues. Fixing these issues is always expensive, but there are methods to mitigate prior to costly pains that start with tackling moisture complications. Unfortunately, getting the research to where we are now took a while, so building projects—whether new or old—are not as safeguarded as they could be.
History of Testing Concrete: Problems with Moisture
Testing concrete for moisture began around 1940 with calcium chloride testing and allowed us to get to a point where we use in-situ relative humidity probes to measure the moisture in cured concrete. Although conclusions of moisture levels in concrete took decades to fully understand, we now can rely on industry verified standards to protect concrete and floor coverings, which enables us to be cognizant of the issues that will arise from elevated moisture exposure.
Just as there is always going to be moisture within the concrete, there is also moisture around it in the air and below it in the soil. Moisture is always transmitting through the concrete, and this can create some serious problems. For starters, the principals of thermodynamics indicate that if the relative humidity in the concrete is different than the relative humidity in the air, then the moisture will either move in or out of the concrete. Similarly, the moisture below in the soil will also search to move into the concrete if there is no protection. Moisture generally migrates from higher relative humidity environments to lower. It can’t be hard to imagine all the issues that will arise with this flowing moisture. This is why moisture testing for concrete is so important.
Consider what will happen if the relative humidity (RH) of the concrete becomes 100% and the moisture continues to try to equalize with the surrounding conditions. The room the concrete is in will become humid, and if there is a floor installed on top of the concrete, then that moisture becomes trapped and there is a whole new set of problems. The adhesive used to apply the flooring will fail, which then leads to the floor failing. This can appear as either bubbling, warping, or complete delamination depending on the material as the adhesive fails due to the extreme moisture. Thankfully, just as there have been advancements in testing for concrete moisture, there are also methods in place to prevent moisture damage.
Necessary Protection: Vapor Barrier vs. Vapor Retarder
Vapor barriers started to come into use in the 1950s, commonly as 6-mil Visqueen (polyethylene plastic). While there is a discrepancy between the term vapor “barrier” and vapor “retarder,” the purpose of both these materials is to protect concrete and other substrates from moisture. Without a vapor barrier, the RH will vary and associated substrates and flooring is at risk of failure. Unfortunately, when vapor protection methods began to be employed, non-moisture sensitive materials were used, which severely diminished the moisture protection they aimed to offer. And if your building is old, like from the 1950s or prior, it is likely that no vapor barrier protection was in place. This means that any moisture testing conducted is likely irrelevant as moisture is free to pass from the soil into the concrete.
Because some use the term “barrier” and “retarder” interchangeably, there is confusion about what these phrases mean and how to best protect against moisture. At base level, a vapor barrier or retarder is a material often laid under the concrete slab and over the soil. It can be constructed of different material depending on the need. The material designates how permeable the layer is, which then helps to define more accurately whether it is a barrier or retarder. Permeability is defined as:
the state or quality of a material or membrane that causes it to allow liquids or gases to pass through it.
(Google; Oxford Languages)
When it comes to the values of permeability, the lower the number, the less permeable the material is (i.e. the better equipped it is to offer protection). When we say vapor barrier, we are referring to a material that has a perm rating of 0.1 perm or less, which is identified as a Class 1 vapor material. Some of these materials can be glass, sheet metal, polyethylene sheet, or rubber membrane. When moving on to Class II or III materials, the perm rate is higher and is more appropriately defined as vapor retarders. However, he flooring industry has transitioned to using the term “vapor retarder” universally to describe products used in this application.
Although we know now how important vapor barriers are, we can see that wasn’t always the case. The problem with this is that the lack of adequate vapor retarders diminishes the value of moisture testing. Manufacturers usually require moisture testing as a prerequisite to warranty coverage, which as we’ve discussed, is necessary in ensuring the flooring will not be damaged by moisture. But that all goes out the window when the first step to ensuring protection against moisture is ignored entirely.
What is it Good For?
The short answer is, if there’s no vapor retarder then moisture testing is almost meaningless—so absolutely nothing! Without a vapor retarder under the slab, moisture is free to travel between the soil and concrete and the moisture in the slab can therefore vary significantly. Seasonal changes, flooding, and other artificial sources can all affect the moisture from below the slab. When a retarder is in place, it limits the ability of these sources of moisture to enter the slab making the decision to install a floor a more reliable one when knowing the moisture condition of the concrete.
If There is No Vapor Retarder, Then What?
Then you install a vapor retarder. That is the only answer. When increased RH values are encountered but a retarder is in place, simply using a more moisture resistant adhesive will suffice, but without a vapor retarder, installing a topical product is the only reliable solution. The saying “you get what you pay for” is truer than ever when considering moisture protection. Many topically applied vapor retarding systems are available on the market ranging from urethane concretes to epoxies, most have very specific installation requirements and constraints that must be strictly adhered to. In the end it’s all about value; a floor installed without a vapor retarder may last for years, or it may fail in a month.
Our concrete moisture testing services relies on both calcium chloride (ASTM F1869 when necessary) and RH testing (ASTM F2170) depending typically on the manufacturer’s requirements and your needs. We will strategize with you the best procedures to test and relay the results in an efficient manner. Whether we can help you determine if the vapor protection place is sufficient or if you need a new one altogether to avoid future damage and save costs is our goal. We offer complimentary consultations via phone at 856-437-7900 or through the contact form below.
As always, Test Moore, Fail Less.
Leave A Comment